 Skip to content


Note: This blog was updated December 2024.
Is your website full of old or outdated posts that no longer provide useful content for your audience? It might be time to delete some blog posts … but only if you’re careful about how it’s done.
When removing old blog posts, it’s important to do things the correct way. Otherwise, your actions will have a negative impact on user experience and search engine rankings. One way to do this is to delete old blog posts using 410 redirects.

410 Redirects: How to (Properly) Delete Old Blog Posts
In this post, we’ll discuss what a 410 redirect is and how it differs from other redirects. We’ll also provide a step-by-step guide on how to implement 410 redirects on your website. If you follow these directions, you can be sure your site visitors and search engines know what was removed and why, maintaining the integrity of your website’s structure and SEO.
Should You Delete Old Blog Posts?
Should you delete old blog posts at all? The answer varies. Definitely look at deleting them if:
- Content is outdated or irrelevant to the point it can’t be updated. If you’re talking about a service you no longer offer, delete the post. If you’re promoting an event from 10 years ago, delete the post. On the other hand, if there are just outdated facts, consider updating and republishing the blog post.
- The post is low quality. Delete the blog post if it’s extremely low quality. This applies to “stub” posts, with 100 words or less, or ones that just feel “off” when you revisit them. If the topic is good but the execution is poor, delete and try again.
- You need to better organize your site. Websites need occasional cleanups. If you find orphaned content or confusing navigation when you spin through yours, consider deletion.
- Your company changes. Feel free to delete posts about the personal experiences of individuals who no longer work for you. The same goes for industries you no longer want to work with.
- Technical issues are noticed. Old posts often contain broken links or duplicate content. Sometimes it’s easier to delete the blog post than to fix it.
- Generative AI was used poorly. If you or someone on your team overused ChatGPT for tons of quick, low-quality content, it’s worth looking at a rewrite or deletion. If it’s worth the time to write an AI prompt, it’s worth the time to give a human take.
If your blog post doesn’t match this criteria, consider updating it, rather than deleting it.
Website Response Codes & Redirects
When you delete a blog post, you create a “response code” when a browser or robot hits the URL. This also occurs when a post is live; if you’re reading this, your browser returned a “200” response. In other words, it worked. Other types of common response codes include:
404: The URL isn’t working, and there’s no stated reason why. This is common with broken links (e.g., from a typo) or when content is deleted haphazardly.
301: Permanent redirect. This response code tells your browser (or Google) to go somewhere else automatically. It renders the original content inaccessible.
302: Temporary redirect. This code indicates that content has been moved temporarily, and will come back in the future.
410: A 410 response code indicates that content is gone on purpose. This is better than a 404 because it’s purposeful. While a 404 could be a mistake, a 410 says “this is gone, and we did it for a reason.”
500: Server error. The content isn’t available because of a technical issue. This is sometimes called a “50X” or “5.X.X.” error, but the “5” always means a server problem.
Intentionally creating one of these response codes is typically called a “redirect.” The most common of these is a 301 redirect, but a 410 redirect is often the correct way to delete a blog post.
Does Deleting Old Blog Posts Hurt SEO?
If you do it right, deleting old blog posts does NOT hurt SEO. In fact, it can help your search engine optimization.
Outdated or inaccurate content provides nothing of value to users, and providing value to users is the brass ring of SEO. Likewise, old posts are problematic if they complicate navigation or contain broken links. It’s better they be deleted in these cases.
On the other hand, you should always try to update blog posts before deleting them. Content that’s been live for a while typically gains some authority and backlinks. If you can retain those and keep your facts up to date, it’s the best of both worlds.
Should I Use a 410 or 301 to Remove Blog Posts?
In general, you want to use a 410 redirect to delete outdated blog posts. But there are times you want to use a 301 redirect instead. Here are the pros and cons of each.
Why Use a 410 to Delete Blog Posts
A 410 redirect tells Google that you meant to delete the content. It’s better than a 404, which indicates that there is a problem, but not why. Google will stop crawling a URL with a 410 status code, as opposed to a 404, which it keeps crawling. This eats into your site’s “crawl budget.” A 410 simply means that the blog post is “gone”; there is no need to find relevant content to redirect the old URL to. In most cases, a 410 redirect is the right way to delete an old blog post.
Why Use a 301 to Delete Blog Posts
A 301 redirect automatically points one URL to another. Any traffic – a human using a browser or a robot – is sent to the target page before they can resolve at the original URL. You can use a 301 to remove old blog posts by redirecting traffic away from the old post and to a new one. This creates several problems, however.
- Using a 301 to delete old blog posts requires that you have similar content to point to. These redirects should always be used to point to related posts or pages.
- 301 redirects keep the old post live (kind of). This complicates site structure.
- In a worst case, 301s pointing to each other creates a “redirect loop.” Redirect loops take entire sites down. They’re bad.
How to Remove Web Posts with a 410 Redirect
Actually removing your old blog posts is relatively simple once you’ve decided what to delete and what to update. I’ll assume here that you’ve taken my earlier advice and decided to use a 410, rather than a 301. These steps are for WordPress blogs with Yoast SEO Premium installed. (The premium edition is $99/year, and well worth it.)
Step 1: Set the post status to “Draft” in Posts >> Quick Edit. This will remove the post from your blog category page, as well as any other places posts are “syndicated” on your site. Note that “Posts” is WordPress’ default name for the post type that appears on a blog. If you are using a different or custom post type, go there.

“Status” lets you quickly publish or unpublish a WordPress post.
Step 2: Head to Yoast’s Redirects manager and select the “410 Content Deleted” option in the Plain Redirects section. This will automatically create a 410 status code for your post.
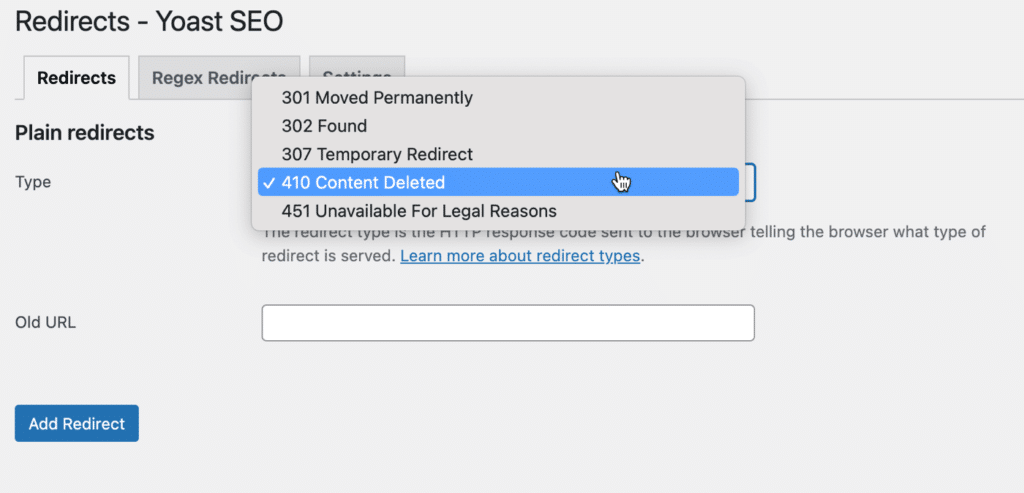
Selecting a 410 redirect in Yoast’s “Redirects” screen
Step 3: Put your post’s URL in the “Old URL” field and hit “Add Redirect.” If you ever need to remove the 410, you can simply delete it in “Redirects.”
That’s it! You’ve successfully deleted an old blog post using a 410 redirect.
tl;dr: Using 410 Redirects to Delete Posts
While there are several ways to delete a blog post, the best is to use a 410 redirect. This tells Google that the post is gone for a reason, keeps your site structure clean and tidy, and doesn’t run the risk of 301 redirect loops.
