Skip to content


LinkedIn Sales Navigator can be a valuable tool for lead generation. In this tutorial, we’ll walk you through the best way to put it to use.
First, we should cover what LinkedIn Sales Navigator is and what it costs.
What Is LinkedIn Sales Navigator?
Think of LinkedIn Sales Navigator like a B2B marketing cheat code for the No. 1 business social media network.
At its core, it lets you run thorough searches, then connect with anyone on LinkedIn regardless of whether you share connections. That alone is valuable.
But LinkedIn Sales Navigator does plenty more, too:
- You get a dedicated inbox for lead generation work
- You can save leads in a quasi-CRM, or send them to your real CRM
- It recommends accounts and connections for you based on past activity
- You get better analytics on your LinkedIn use
- Critical to this tutorial, you can save searches for repeat use
In all, LinkedIn Sales Navigator is pretty cool once you know the best practices. It’s not a magic bullet for lead generation, but it’s a heck of a backup plan to SEO and digital marketing.
What Does LinkedIn Sales Navigator Cost?
LinkedIn Sales Navigator comes in three pricing tiers:
- The Professional plan, which we’ll demo here, gives you the basics. It’s good for individual salespeople, or executives at smaller companies and startups. It costs $79.99/month, or $64.99/month paid annually.
- The Team plan gives larger sales teams more features. These include more InMail messages, more saved leads and sharing functionality. It costs $134.99/month, or $103.33/month paid annually.
- The Enterprise plan is basically an all-you-can-eat buffet for huge companies and sales teams. LinkedIn doesn’t publish pricing for the Enterprise level of Sales Navigator.
Our recommendation: Start with the LinkedIn Sales Navigator Professional tier. It’s very functional, and you’ll have to use it a lot to outstrip its limits.
A Word of Warning
We can’t stress this enough: LinkedIn Sales Navigator should not be the only arrow in your lead generation quiver.
Think about it big picture.
The lead generation best practices we’re giving you here are really just cold calling.
Sure, there’s a layer of data in play. And you don’t actually have to pick up the phone.
But it’s still cold calling.
To wit, a typical LinkedIn Sales Navigator lead gen success rate is about 1%. That means 99 out of 100 attempts will fail.
Anyone who tells you LinkedIn Sales Navigator lead generation will change your business overnight is lying to you. (But by this point you probably know you should ignore the get-rich-quick screamers advertising on YouTube.)
If you’re selling a big-ticket product, though, a few net-new leads can really move the needle. That’s really what we’re after here.
With that cynicism out of the way, here’s a LinkedIn Sales Navigator tutorial covering lead generation best practices.
Lead Generation Tutorial
In this section, we’ll walk you through how to use LinkedIn Sales Navigator for B2B lead generation. There are a lot of steps, but trust us: It’s a pretty simple tutorial.
Step 1: Sign Up!
You’ll need to start a LinkedIn Sales Navigator account to do this. Your first month is free, so we highly recommend this. If you don’t get anything out of it, go ahead and cancel.
Yes, LinkedIn requires a credit card to start your free trial. So remember to set a calendar reminder to cancel if it’s not working for you.
Step 2: Log In
Log in to LinkedIn like usual. The only difference is that you’ll see a “Sales Nav” icon at the top right:
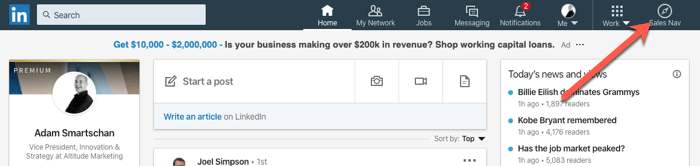
Click this to head over to LinkedIn Sales Navigator. It’s really a separate app from the LinkedIn you know and love.
(Or “love.” Probably that.)
Step 3: Run the Wizard
The first thing LinkedIn Sales Navigator does is run you through a wizard. Honestly, you can skip most of this unless you have a very defined niche or geographic target. The power of LinkedIn Sales Navigator (and the crux of this tutorial) is search.
But go ahead and run through the wizard anyway. Can’t hurt. Just skip anything you’re not sure of.
Step 4: Advanced Search
The most important feature in LinkedIn Sales Navigator is advanced search. This lets you find potential contacts and leads by a number of criteria:
- Keywords
- Geography
- Company name
- Their relationship with you and your network
- Industry
- Company size
- Seniority
- Job function
- Title
- Tags and lists you added
There is no one-size-fits-all solution for LinkedIn Sales Navigator search. You’re going to have to tailor your efforts to find what you’re looking for.
Sometimes a job title and industry are enough. (That’s pretty common.) Occasionally you’ll want to layer on seniority or company details.
But sometimes job title isn’t a great fit.
For example, let’s look at individuals at mid-sized property management firms. Their titles are all over the map, so that won’t help much. And they have a ton of job functions, so that won’t work, either. Plus we can’t possibly know every company’s exact name; there are thousands of them.
Instead, we’re going to do a search by keyword (“property management”). This will whittle us down, but still return a lot of realtors and other non-targets.
Then we’ll narrow the search to the U.S. And finally we’ll use company name to only include firms with “property management” in their branding.
Watch as the number of results goes down with each step.
The result? A pretty darn good list of decision-makers at property management companies.
Step 5: Engage with Potential Leads
Once you’ve run your search, you probably have a list of thousands of potential contacts.
Scroll through and find an interesting one.
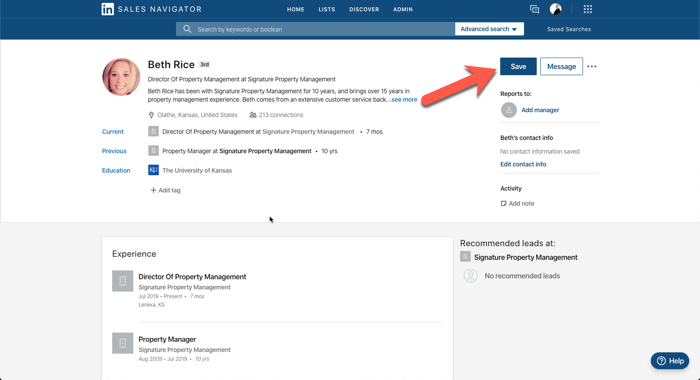
In our case, we’re going to settle on a Director of Property Management at a firm in Olathe, Kansas. Good company, good location, good title. Everything we want.
Now you can do a number of things:
Save the contact. This lets you add the potential lead to a list. Say, “Kansas,” or “Directors.” If you want to keep tabs on multiple leads in one place, this is a great idea.
Message the contact. This is done through LinkedIn’s InMail feature. You get 20 of these a month on the Professional plan, so use them sparingly. You don’t need to be a contact to InMail someone when you’re using LinkedIn Sales Navigator.
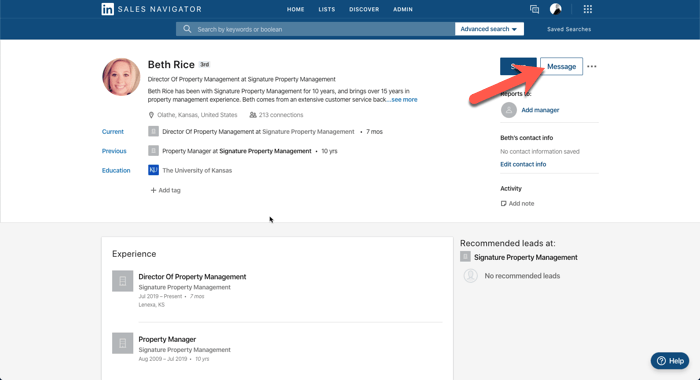
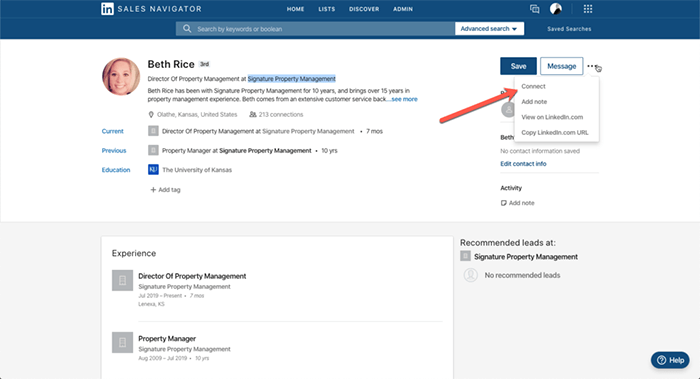
Connect. This is what you really want to do in most instances. It’s basically a workaround for the InMail limitation. If you make a connection, you can try to continue the conversation.
(This feature is in the three dots section next to “Message.”)
Now, please don’t be a spammer. Only connect to folks who might actually need what you’re selling. And limit your connections to 10/day or so. Send too many and LinkedIn will shut you down.
Likewise, avoid software tools that promise to “automate LinkedIn Sales Navigator.” These are just spam tools with a different name. Icky.
Step 6: LinkedIn Sales Navigator Connection Script
Most folks (except “LIONs“; remember those?) aren’t going to accept connections from random strangers. You want to give them a reason to.
When you click “Connect,” you’ll have the option to include a personal message. Use a script like this:
“Hi [First Name],
I’m [Your Name], the [Title] of [Your Company]. We help [People Like Them] [Do Stuff That’s Good]. I’d love to connect and discuss the potential of working together. Do you have some time this week or next for a 10-minute conversation?
Sincerely,
[Your Name]”
Will you get a 100% hit rate? Absolutely not. But you’re being honest about who you are and what you do. That goes a long way.
Step 7: After the Connection
If they accept, LinkedIn Sales Navigator will let you know in your Sales Navigator Inbox. This is basically email or Slack within the application – it’s where you keep conversations going.
At this stage, have a look at the new connection. You can see, for instance:
- Things you have in common, like connections, past work experience and education
- People who you can namedrop
- Their recent activity, like posts
- Their work experience
The more personal you can get, the better. (But don’t be weird about it.)
At this stage, jump into the Sales Navigator Inbox and write a note to:
- Thank them for accepting
- Note any commonalities you have
- Explain what you do and how it helps people like them
- Explicitly ask for a short call in the next week or two

Some LinkedIn Sales Navigator users like to follow up if they don’t hear back on the first message. This is totally your call. Be as pesky as you like, but keep in mind that your name is being associated with it.
At this stage, you’re going to want to send the lead to your CRM, too. At the very least, make sure you have them saved on a Sales Navigator list.
LinkedIn Sales Navigator Tutorial: That’s It!
In terms of a LinkedIn Sales Navigator tutorial for lead generation, that’s pretty much all there is to it.
The application does a lot more – it can even replace some small CRMs. We urge you to try it out and see what it can do for you. But if all you’re looking for is digital cold calling, what’s in this post will suffice.
We hope you’ve enjoyed learning how to use LinkedIn Sales Navigator. Happy prospecting!