If your marketing website is built in WordPress, you absolutely need to know how to use hidden fields in Gravity Forms. Without them, there’s no good way to pass critical context on to your sales team, CRM or email system – all the stuff that can turn a lead into a sale.
In this how-to video, we cover:
- Why Gravity Forms is an awesome choice for your WordPress forms
- Examples of where you might use hidden fields in Gravity Forms
- How to send data from your hidden fields to other systems without ever touching code
- How hidden fields can help increase conversion rate and improve lead attribution
Helpful Links
- Official Gravity Forms Documentation on Hidden Fields
- Official WordPress Website
- Blog Post: How to Create a Single Source of Truth for Marketing Data
- Web Development for B2B Marketers
Step by Step: Creating a Hidden Field in Gravity Forms
Gravity Forms makes it really easy to create hidden fields in your forms. Here’s step-by-step instructions on how to do it.
First (obviously) you’ll need to create your form and add whatever human-usable fields you want. At minimum you’ll want a prospect’s email address, but most companies also ask for their name and organization. Asking for a phone number is a huge “maybe” – every sales person wants it, almost no prospects want to give it. We err on the side of not asking for the phone number.
Hidden fields are great additions to this information. You can use them to pass your own custom data (e.g., the words “Marketing Strategy”) to the sales team and other systems, or you can use them for dynamic data, like:
- The user’s IP address
- The page or post title
- The page or post URL
- URL parameters, like UTM codes
Whatever you’re using it for, it’s easy to add a hidden field. Here’s how.
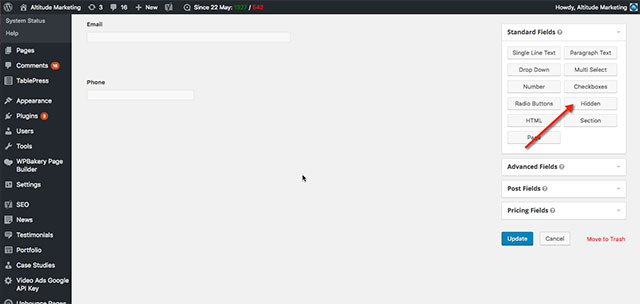
Step 1: Add the field
Just like any other Gravity Forms field, just click the field type (it’s under “Standard Fields”) and it will show up at the bottom of your form. If your form is large, this might take a few seconds – don’t keep clicking.

Step 2: Name the field
DO NOT leave your Gravity Forms hidden field with the Field Label “Hidden Field.” Call it something memorable so you can actually use it later.
Step 3: Set Up Your Data
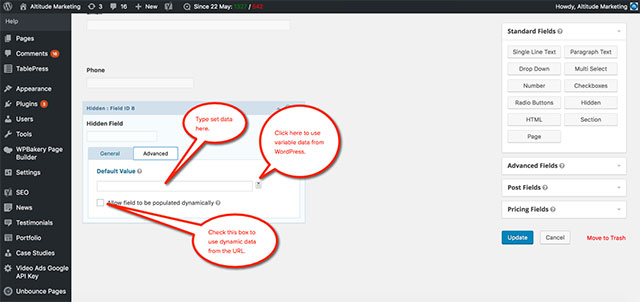
Click “Advanced” within the hidden field dialogue and direct your attention to the “Default Value” field. This is where you set the data that you want to accompany the form submission. You can:
- Type into the box (e.g., if you want to use a set term, like “Marketing Strategy” or “1”).
- Use variable data from WordPress, like the page/post URL or the user’s IP address.
- Use dynamic data from the URL, like UTM parameters.

That’s it!
From here, you can use your Gravity Forms hidden fields just like any other fields. In other words, you can:
- Include the data in notification emails to the user or sales team
- Pass the data through to webhooks as URL parameters
- Populate fields in the CRM
- Enrich data going to your email system or marketing automation platform for future segmentation
Have questions about using hidden fields in Gravity Forms? We’re happy to help. Contact us online, or give us a call at 610-421-8601 x122. We’d love to chat.


